You’ll master steam cleaning by matching your machine to the task—floors need a mop, carpets need a heavy-duty unit, and counters need a handheld model. Fill your tank with distilled water, let it heat for 3-5 minutes until steam builds to 350-450 PSI, then apply controlled bursts 6-12 inches from sealed surfaces like tile and granite. Wipe each section with a microfiber cloth, avoiding unsealed wood and delicate fabrics. The specifics of proper technique and maintenance reveal why many people damage their floors.
Match Your Cleaning Task to the Right Steamer Type
You’ll find that selecting the appropriate steam cleaner hinges on identifying your specific cleaning application. For hard floors and tiles, you’ll want models like the PurSteam Steam Mop or Kärcher SC 3 Upright EasyFix, which deliver powerful steam production. If you’re tackling carpets, the BISSELL PowerSteamer Heavy Duty 3-in-1 proves ideal.
Next, assess required steam power based on your task’s difficulty. Commercial environments demand high-pressure units like the Therma-Kleen XL3 at 155 PSI, while kitchen counters need versatile handheld options such as the Steam & Go Housekeeper 10-in-1. The Sharper Image SI-380 Canister Steam Cleaner operates at up to 54 psi and works effectively on multiple surfaces including tile, grout, carpets, and upholstery. The high temperatures in steam cleaners are particularly effective at killing bacteria and pathogens without requiring harsh chemicals. Using distilled water in your chosen steamer prevents mineral buildup and ensures consistent performance over time. Steam penetrates surfaces and loosens dirt and grime through heat and moisture, making it highly efficient across various applications.
Finally, determine compatible accessories your chosen steamer offers. Grout cleaning requires specialized attachment sets, restroom sanitation needs disinfection capabilities, and appliance cleaning demands precision nozzles. Matching these three factors guarantees efficient, effective cleaning results.
Fill Your Steam Cleaner Tank With Distilled Water
Once you’ve selected the right steam cleaner for your task, the next step involves preparing it for operation by filling the tank with the proper water. You’ll want to use distilled water exclusively, as the benefits of distilled water considerably impact your machine’s longevity and performance. Distilled water eliminates mineral buildup that clogs nozzles and reduces steam output, preventing the limescale accumulation that requires frequent maintenance.
Distilled water availability makes sourcing it convenient—you’ll find it readily at most grocery stores and pharmacies at minimal cost. Fill your tank completely before each use, ensuring ideal steam pressure throughout your cleaning session. Using distilled water also prevents corrosion and damage to your steam cleaner’s internal components caused by hard water minerals. The high-temperature water vapor generated by your machine depends on pure water to function effectively. Avoid tap water, which contains minerals that cause corrosion and foaming issues. Never add cleaning solutions or detergents to your steam mop tank, as these substances can damage internal components and void your warranty. Vinegar and other acidic solutions can degrade rubber seals and gaskets, compromising your machine’s performance. By committing to distilled water, you’ll maintain consistent cleaning power and extend your steamer’s operational lifespan substantially.
Let Your Machine Heat Up and Build Steam
After filling your tank with distilled water, plug in the machine and allow it to heat up before beginning any cleaning work. Most handheld units reach operating temperature within 3-5 minutes. You’ll notice a red indicator light activating upon startup; it’ll turn off once the machine achieves readiness.
During heating, water converts to pressurized steam within the boiler chamber, typically building to 350-450 PSI depending on your model. This pressure guarantees deep penetration into surfaces and crevices. Always ensure the electrical cord is unplugged until the unit has completely cooled before storing it away. For optimal longevity, remember to empty the water tank after each use to prevent mineral buildup and maintain your cleaner’s performance.
Before cleaning, test steam release by pointing the nozzle safely away and holding the trigger briefly. Adjust your power settings based on the surface you’re cleaning—generally 400-450 PSI at 150-160°F works ideally. Allow adequate steam duration to loosen dirt and bacteria effectively before wiping surfaces clean. Different surfaces require specific attachments, such as brushes for grout or pads for floors, to ensure optimal cleaning results. Regular descaling] of your steam cleaner will help maintain its efficiency and prevent mineral deposits from affecting performance.
Which Surfaces Are Safe to Steam (and Which Aren’t)?
Before you direct pressurized steam toward any surface, you’ll need to understand which materials can withstand the heat and moisture without sustaining damage. Sealed hardwood, tile, and granite tolerate high temperatures effectively. Laminate requires low-temperature settings and minimal contact time. Avoid unsealed hardwood, which warps from moisture penetration, and luxury vinyl plank, which buckles under steam heat.
For non-floor surfaces, stainless steel appliances and sealed countertops clean streak-free. Skip painted walls, wallpaper, and delicate fabrics like silk that sustain damage. Upholstered furniture and mattresses handle steam well for deep sanitization. Natural stone floors like marble and slate can also be steam mopped if they have been professionally sealed to prevent moisture absorption. While many flooring manufacturers caution against steam mops for vinyl plank due to water seeping between planks, checking manufacturer guidelines before steaming ensures you don’t void your warranty. The excessive heat and moisture from steam can cause warping, swelling, and buckling in laminate flooring over time, particularly damaging the moisture-sensitive fiberboard core beneath the surface layers. Steam mops can also damage protective finishes on hardwood floors, which is why many manufacturers explicitly warn against their use.
Sealing floor materials before steaming protects against moisture damage. Always verify your flooring type and sealant condition before proceeding. Test inconspicuous areas first to confirm compatibility with your steam cleaner’s heat output.
Choose the Right Steam Cleaner Attachment for Your Surface
Since different surfaces require targeted cleaning approaches, selecting the appropriate attachment is critical for effective results and preventing damage. Your attachment selection determines cleaning efficiency and surface protection.
For floors and tile, you’ll use the steam floor spinner with vacuum extraction to handle flat surfaces effectively. Grout lines benefit from the nylon-tipped attachment that lifts embedded dirt while steaming. When tackling upholstery, the bonnet attachment and upholstery nozzle provide enhanced sanitizing action with fast drying. The distilled water recommendation helps prevent mineral buildup that can damage your steam cleaner’s performance over time.
Targeted steam application demands precision tools for detailed work. The grout lance and steam lance focus steam on narrow spaces and crevices, while extension tubes increase your reach to high or tight areas. Cleaning brushes attach and lock for safe scrubbing. Windows require the squeegee attachment to remove fingerprints efficiently. Steam cleaning’s chemical-free sanitation makes it an ideal choice for households seeking safer alternatives to traditional cleaning methods. The high-temperature steam effectively eliminates bacteria, germs, and allergens without requiring harsh chemicals, making it particularly suitable for families with children and pets. Professional-grade steam cleaners that reach temperatures between 175°F to 212°F are particularly effective at destroying pathogens that require high heat for inactivation.
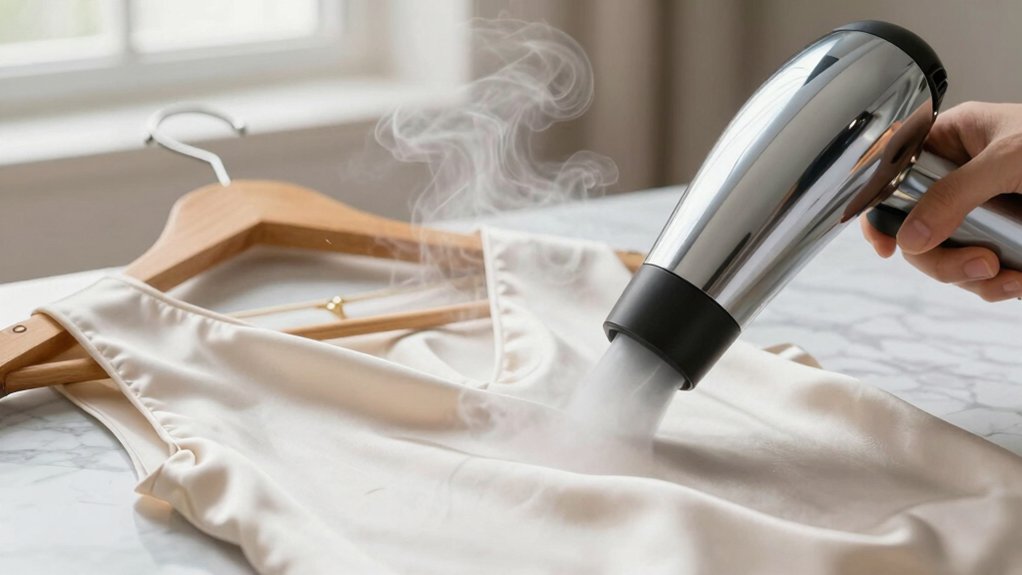
Apply Steam in Short Bursts and Wipe Clean
The effectiveness of your steam cleaning depends on applying steam in controlled bursts rather than continuous streams. Hold the nozzle 6–12 inches from the surface and use low or medium settings to prevent oversaturation. This proper technique loosens dirt without soaking spots.
Consider surface considerations when wiping. For fabric, move slowly to allow steam penetration; for walls, use top-down vertical strokes. Immediately follow steam application with a microfiber cloth, wiping section by section to remove loosened debris. Use a squeegee on hard surfaces, scraping condensed water downward. On leather, follow the cloth with a dry towel for ideal results. The pressurized steam created at temperatures between 175-212°F effectively breaks down molecular bonds of dirt and grime for superior cleaning results.
Keep steam moving continuously across surfaces. Short bursts combined with immediate wiping prevent streaks and maintain surface integrity while maximizing cleaning effectiveness. The heat and moisture working together help break down stains more efficiently, ensuring deeper penetration into fibers and surfaces for superior results. For optimal disinfection, maintain contact time of 15-30 seconds on each area to effectively eliminate bacteria and viruses. Steam mops can kill up to 99.9% of germs without relying on harsh chemicals, making them an excellent eco-friendly option for households.
Common Steam Cleaner Mistakes That Damage Floors and Stone
While steam cleaners effectively tackle many surfaces, they’ll damage certain flooring materials if you’re not careful about where you apply them. Never use steam on laminate or hardwood floors—the heat and moisture combination warps planks and breaks down protective finishes. Unsealed natural stone like travertine suffers similar damage when steam drives moisture deep into the material, eroding surface integrity. Manufacturers of hardwood flooring typically void warranties if steam cleaning is used on their products. The excessive moisture from steam can cause engineered wood layers to separate and buckle over time.
Improper solution usage poses another critical risk. Don’t add chemicals or cleaners to your steam tank; manufacturers design machines for water only. Adding solutions causes machine blockages and leaves harmful residue. Additionally, steam should never be used on veneered furniture, as the heat and moisture can soften adhesives and cause the veneer to bubble or delaminate.
Over-wetting problems accelerate floor deterioration. Excessive moisture oversaturates carpets, promoting mold growth, and shortens hardwood lifespan through warping. Keep your cleaner moving consistently and adjust water settings appropriately to prevent saturation damage.
Maintain Your Steamer: Cleaning, Storage, and Troubleshooting Tips
Regular maintenance extends your steam cleaner’s lifespan and guarantees consistent performance across all surfaces. You’ll need to perform periodic descaling every 3-6 months using a mixture of equal parts white vinegar and water. Let the solution sit for 30 minutes, then rinse thoroughly until the vinegar smell disappears.
Inspect attachments and nozzles after each use, removing debris with a soft brush or paper clip. Wash microfiber pads and dry all parts before storage to prevent mold. Monitor seals and hoses for damage, replacing worn parts immediately to avoid leaks. Using distilled or demineralised water instead of tap water prevents mineral buildup that can compromise your machine’s performance.
Empty your water reservoir after each use and allow it to air dry completely. Store your steamer in a dry location. Address drops in steam output promptly to prevent costly repairs.